
If you bought an adjustable pillow and it still feels wrong after a week, you almost certainly haven't set it up correctly. That's not a complaint about the pillow. It's just the nature of the format: shredded foam pillows ship overfilled by design, because manufacturers can't know your shoulder width, your mattress firmness, or whether you run warm. The factory default loft is a starting point, not a finished product. Getting from that starting point to the support your neck actually needs takes about twenty minutes of real setup and two or three nights of iteration. Most people skip all of it, sleep badly, and blame the pillow.
I've been a side sleeper my whole life and spent most of my thirties waking up with a stiff neck that didn't loosen until noon. I've worked through a lot of pillows. The Coop Home Goods Original Crescent is the one that finally made me understand that pillow fit is a geometry problem, not a softness preference. This guide walks through every step I use to get a shredded foam pillow dialed in for side sleeping, starting with the first unzip and ending with a loft that holds its shape through the night.
Still waking up with a stiff neck? The Coop Crescent lets you remove or add fill until the geometry is exactly right.
With 65,000+ reviews and a 4.5-star rating, it's one of the most widely adjusted pillows on the market. The adjustable fill is the whole point.
Amazon Check Today's Price on Amazon →Step 1: Measure Your Shoulder Width Before You Touch the Zipper
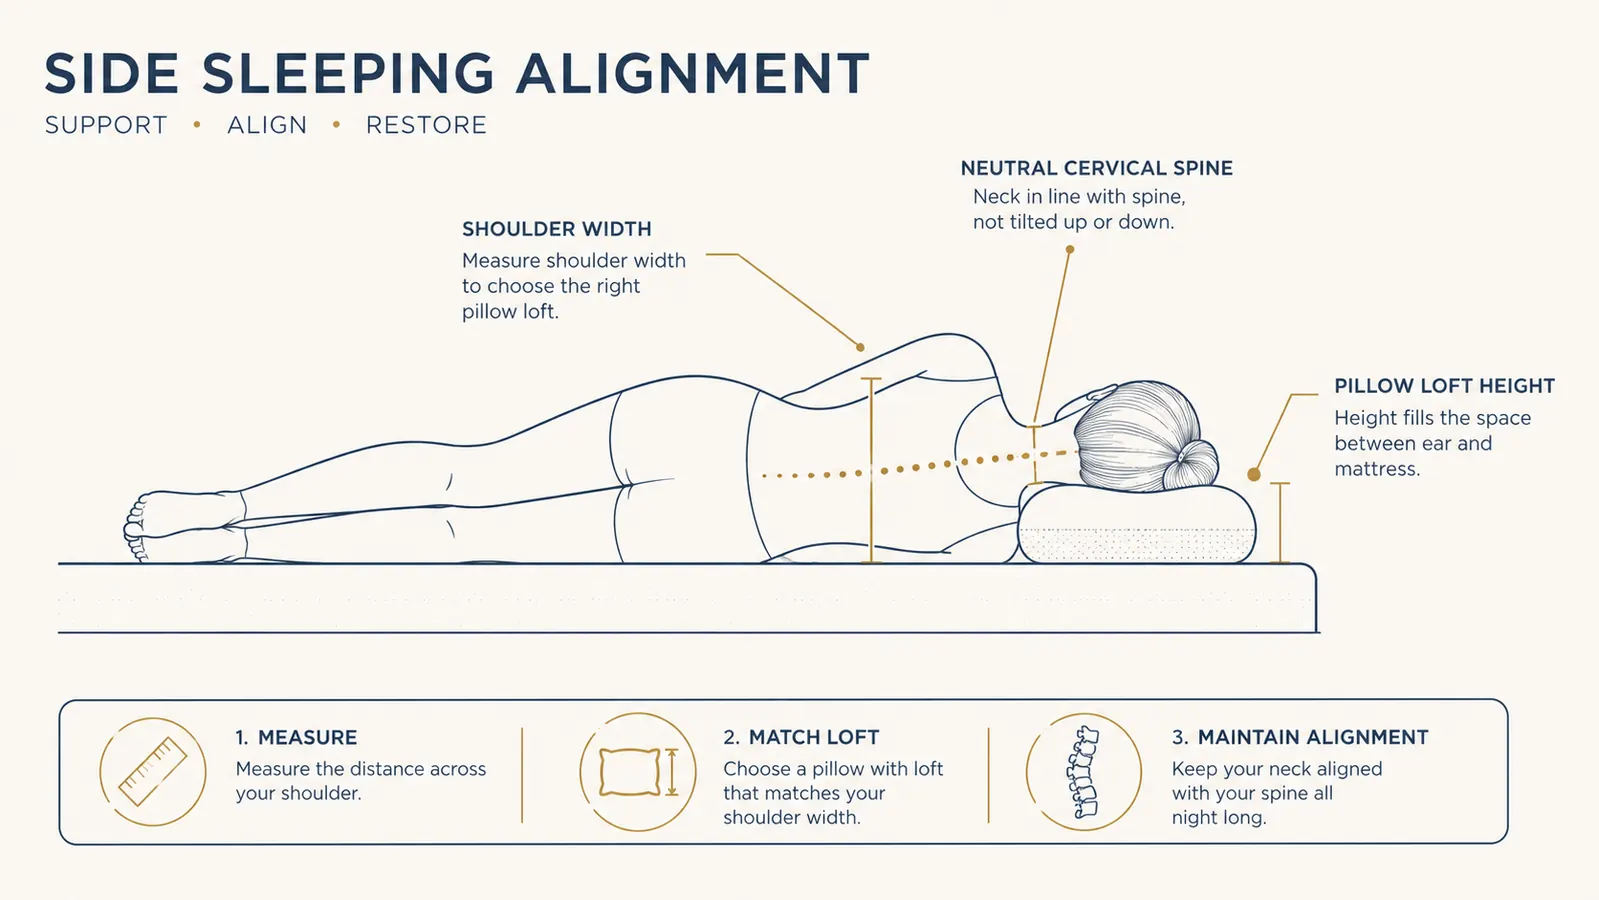
The single number that drives every other adjustment is the distance from your mattress surface to the side of your head when you're lying down. Practically speaking, this is your shoulder width, because your shoulder is the structure holding your head up off the mattress. A wider shoulder needs a taller pillow. A narrower shoulder needs a flatter one. If you skip this measurement and just guess, you'll spend a week chasing a target you can't name.
Here's how to measure it without a second person: lie on your side on your usual mattress with no pillow. Have someone place a flat book against the side of your head and mark the mattress surface directly below the book's spine. Then measure from that mark straight up to the book. That number, in inches, is your baseline target loft. Most adult side sleepers land between 4 and 6 inches. Narrow-shouldered people or those on very soft mattresses (which compress under your shoulder) often need 3.5 to 4.5 inches. Broad-shouldered people on firm mattresses sometimes need 5.5 to 6.5 inches.
Write the number down. You will reference it when you start pulling fill in the next step, and again on night two when you do your first tweak.
Step 2: Open the Inner Liner and Remove Fill in Controlled Amounts
The Coop Home Goods ships with both a standard fill amount and a separate bag of extra fill so you can go higher if needed. Before you do anything else, open the outer cover's zipper, then open the inner liner's zipper (it's a separate layer, intentionally fiddly to keep the foam from escaping on its own). The fill you're working with is a blend of shredded memory foam and microfiber, so it's light, compressible, and easy to move around. What it is not is easy to put back once it gets loose on your bed, so work over a clean surface or keep a storage bag nearby.
Start by removing roughly a large handful at a time. For most people, the factory default is at least one to two full handfuls too much for side sleeping. Side sleeping compresses the fill under your head more than back sleeping does, so you need less volume to reach the same effective loft. Zip both layers closed after each removal, lie down, and check your alignment. You're looking for a neutral cervical curve, which means your ears, shoulders, and hips form a straight line when viewed from behind.
A common mistake: people remove fill until the pillow feels flat in their hands, then put it back because it looks wrong. Ignore how it looks when you're holding it upright. Shredded foam redistributes when compressed by the weight of your head. A pillow that looks thin on the table often delivers the right loft in actual use.

Step 3: Position the Crescent Shape Correctly for Your Shoulder
The Crescent pillow has a contoured shape that's easy to misread as purely aesthetic. The curved lower edge is designed to accommodate your shoulder so the pillow can sit flush against your neck without bunching at the shoulder seam. Side sleepers who ignore this and center the pillow symmetrically on the bed often end up with the fill pushing their shoulder forward, which rotates the spine and creates the same morning stiffness they were trying to fix.
Position the curved cutout so it faces down toward your shoulder, not up toward your face. The thicker upper portion supports the side of your head. When this is done correctly, your shoulder should tuck into the curve rather than ride up against a flat edge. If you're a combination sleeper who also spends time on your back, the crescent shape works well there too, as the curved recess cradles the base of your skull. But for side sleeping specifically, the orientation matters more than most people realize when they first take it out of the box.
A pillow that looks thin on the table often delivers the right loft in actual use. Ignore how it looks when you're holding it upright. Let your neck tell you what's working.

Step 4: Sleep on It for Three Nights Before Adjusting Again
This is the step most people skip, and it costs them two weeks of unnecessary tinkering. Shredded foam has a break-in period. The foam shreds compress and redistribute over the first several nights of use, and the loft you measured on night one will be meaningfully different from the loft on night four. If you adjust every single morning, you'll never get stable feedback because you're always chasing a moving baseline.
Set a rule for yourself: make one fill adjustment, then sleep on it for three consecutive nights before making another. On the morning of day three, take stock. Is your neck neutral when you wake up, or tilted up toward the ceiling (pillow too thick) or angled down toward the mattress (pillow too thin)? Morning neck stiffness on its own isn't a reliable signal in the first three days because muscles are adapting to a new position. The angle of your head is the more honest data point.
If you have a partner or a tall mirror beside the bed, lie down in your sleeping position and take a photo or have them check your alignment. You want a straight horizontal line from the crown of your head through your spine. Most people need one round of three-night testing and one follow-up adjustment. Very few need more than two rounds.
Step 5: Fine-Tune for Mattress Firmness and Sleep Temperature
Two factors that most pillow guides ignore: mattress firmness and whether you sleep warm. Both affect how much fill you actually need. A firm mattress doesn't compress much under your shoulder, so your shoulder stays high and you need a taller pillow to bridge the gap to your head. A plush mattress sinks under your shoulder, bringing it closer to mattress level, so you need less loft. If you recently changed mattresses or added a topper, expect to revisit your pillow fill entirely. The geometry shifts even if nothing about your body did.
Temperature matters because people who sleep warm tend to press their face deeper into the pillow, which compresses the fill more than average. If you consistently wake up hot and find your face nearly touching the mattress through the pillow, you may need slightly more fill than your shoulder-width measurement suggests. Conversely, people who sleep cool and stay mostly still tend to find the textbook shoulder-width loft works without modification.
The Coop Home Goods's blend of shredded memory foam and microfiber is noticeably more breathable than solid foam alternatives. If heat retention is your main concern, using slightly less fill (flatter profile, more airflow through the fill) and pairing with a cooling pillowcase makes a real difference. The adjustability lets you optimize for two variables at once, which a fixed-foam pillow simply cannot do.
What Else Helps Side Sleepers Get the Most from Their Pillow
Pillow loft is the biggest lever, but it's not the only one. A few other adjustments that compound with good fill setup: First, check your mattress topper situation. If your sleeping surface has any sag near the edge where you sleep, your shoulder is already dropping into an asymmetric position before the pillow even comes into play. Fixing the surface makes the pillow work better. Second, look at how far your shoulder hangs off the edge of the bed. Many side sleepers who complain of shoulder pain are actually sleeping too close to the edge of the mattress, which lets the shoulder drop below the support zone. Move toward the center by a few inches and retest. Third, consider a body pillow between your knees. It sounds unrelated to your neck pillow, but hip alignment affects the entire spine, and a misaligned hip often shows up as neck tension. Getting your hips level frees the rest of the spine to settle into its natural position.
None of these substitutes for the pillow work. But if you've done all five steps above and still have residual morning stiffness, one of these surrounding factors is almost always the explanation. Side sleeping puts more total load on the support system than any other sleep position. The pillow is one component of that system, not the whole thing.
Done guessing at pillow height? The Coop Crescent is built to be dialed in, not just dropped on a bed.
The zippered inner liner makes fill adjustment easy, and Coop includes extra fill so you can go higher if your shoulder width demands it. Over 65,000 reviewers have worked through this same process.
Amazon Check Today's Price on Amazon →